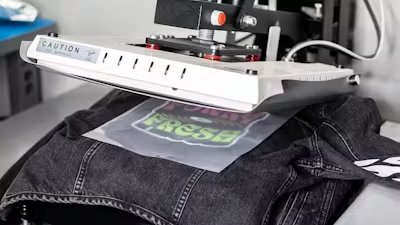
Pocket printing can be tricky. Whether you're dealing with the chest pocket of a polo, the back pocket of a pair of jeans, or the roomy front pouch of a hoodie, applying DTF transfers to these small, often awkwardly positioned areas presents unique challenges. But don't let that deter you from mastering this valuable skill.
In this guide, we unpack the essentials of pocket printing, from core principles to practical techniques. Whether you're working with a heat press, a Cricut, or even a household iron, we explore various methods to achieve smooth, durable pocket prints and share tips to elevate your game. So grab your transfers, and let's turn those pockets into prime real estate for eye-catching designs.

Table Of Contents
Pocket Pressing Principles
Before we dive into specific techniques, here are the basic principles for pocket-pressing success:
- Isolate the print area: Focus your heat and pressure on just the pocket for best results.
- Create a smooth, flat print surface: Work around raised pocket seams and eliminate bumps and wrinkles.
- Elevate the print zone: Raise the pocket above surrounding seams to ensure flush contact with your heat source.
- Cushion the entire area: Use a soft underlayer so raised edges sink in while keeping a level surface for the transfer.
Methods For Pressing On Pockets
With the principles in mind, let's break down the various methods for pressing DTF transfers onto pockets. Each technique applies the core concepts in different ways, giving you flexibility based on your equipment and project needs.
Smaller Platen
Many heat press machines come with interchangeable bottom platens, including specialized sizes for pockets. These compact platens fit inside various pocket types, creating an ideal flat surface while isolating the print area from the rest of the garment.
For larger pockets, such as back pants pockets or hoodie pockets, a sleeve platen can often do the trick. Thread the pocket onto the narrow platen so the rest of the garment hangs free. In some cases, a hat press can even be used for pocket printing if the pocket can be threaded onto it effectively.
Some heat presses offer multi-pocket platens, typically with three prongs, allowing you to press multiple pockets simultaneously. By using a platen that closely matches your pocket size, you not only improve print quality but also reduce the risk of scorching the surrounding fabric. Learn more about how to pick a heat press.

Heat Press Pillows
Heat press pillows are versatile tools that can significantly improve your pocket printing results. These cushioned pads come in various sizes and are designed to be inserted between fabric layers, directly under the print area.
For pocket printing, choose a pillow slightly larger than the pocket itself. Place it underneath the entire pocket area, allowing the raised seams to sink into the cushion when pressure is applied. This creates a smooth, flat print surface while maintaining even contact with the heat source.
While the smallest heat press pillows may not fit into standard left chest pockets, they're ideal for larger pockets like back pants pockets or hoodie pockets. The pillow helps distribute pressure evenly for consistent transfer application even over seams and edges.

Mousepads
Mousepads offer an ingenious and cost-effective solution for pocket printing. Their dense foam composition provides the right balance of cushioning and stability, making them an excellent alternative to specialized heat press pillows.
To use mousepads for pocket printing, cut them to fit your pocket dimensions. A good starting size is approximately 4" x 5", but you may need to go smaller for certain pockets.
Pro Tip: Snip off the corners or round them slightly to make insertion easier. Slip the mousepad inside the pocket before pressing. This elevates the print area above the pocket seam edges, allowing flush contact with the heat source.
Consider ordering mousepads in bulk so you can create a variety of sizes to have on hand. A diverse set of custom-cut inserts helps you tackle different garment styles and pocket sizes efficiently.

Folded Parchment Paper
When you need a quick, readily available solution, parchment paper can double as a pocket insert for a polo or t-shirt, following the same principles as pillows or mousepads.
Fold a sheet repeatedly until you achieve a thickness of at least half an inch, then shape it to match the pocket size. The goal is a cushion firm enough to elevate the print area above the seams, but soft enough to let seams sink in slightly when pressure is applied.
You’re not limited to parchment paper—butcher paper or craft paper can work too. While not as durable as mousepads or specialized pillows, this method is simple and accessible, making it perfect for occasional pocket prints.

Mini Cricut Or Home Iron
Even if you have a full-sized heat press, smaller tools like a Mini Cricut or a household iron can be great for pocket printing. These compact devices offer precision and control that’s especially useful for small pocket designs.
A Mini Cricut is ideal for pocket-sized prints because it applies heat directly to the transfer area without affecting the surrounding fabric. This targeted approach reduces the risk of scorching larger parts of the garment.
Similarly, the narrow tip of a household iron can be surprisingly effective. Set the correct temperature and apply firm, even pressure. It may take practice to get consistent results, but the iron’s maneuverability helps navigate tricky pocket contours. Whether you're using a Cricut or an iron, these tools shine when a full-size press is overkill.

Pocket Printing Tips
Now that we've covered the methods, here are key tips to elevate your pocket printing game and achieve consistent results.
- Design size: Keep pocket designs modest. Hoodie pockets offer more real estate (up to about 6" x 4"), but ensure your design fits the smallest size in your production run. Oversized designs risk touching raised seams, compromising durability. Consult our transfer placement guide.
- Design details: Simplicity wins on pockets. Avoid intricate designs, tiny text, and free-floating elements that can cause peeling and adhesion issues. Most pocket prints work best as clean logos. Get more DTF design tips for beginners.
- Use a silicone garment protector pad: Silicone protector pads distribute heat evenly and add cushioning, which is crucial when dealing with pocket seams and other protrusions. Lay one over your transfer, or attach it to your top platen for repeat use.
- Always do a second press: After peeling, cover the design with parchment paper or your silicone pad and press again. This improves durability and finish—especially important on pockets that see more wear. Refer to our video and detailed instructions.
- Adjust your pressure: Inserts like pillows, mousepads, and folded paper add thickness. Dial back pressure so you don’t over-crush the pocket seams and create uneven results.

Pocket Printing Perfected: Achieving Seamless Success
Pocket printing doesn't have to be a pain point in your DTF transfer process. With the right techniques and a bit of creativity, you can turn these small spaces into standout features on any garment. Whether you're using specialized equipment or DIY solutions, the key is to follow the core principles: create a smooth surface, isolate the print area, elevate the design, and provide proper cushioning.
Practice makes perfect—experiment with different methods to find what works best for your projects and equipment. When you're ready to take your pocket printing to the next level, Ninja Transfers is here to support you with high-quality, custom-printed DTF transfers and supplies. Plus, streamline your process with one-stop shopping at Ninja Blanks. Pocket these new skills and watch your custom apparel business grow.