直接跳至内容部分
The current Eastern Standard Time (EST) is: 2024-12-21 07:18:57 | Hours:07 | day: 6 | Week : Saturday | IsVisible: false
Blank Apparel That Always Ships Free! Order Today, Get as Early as Tomorrow!
 
loyalty Ninja Rewards Sign up and earn

Earn points
Redeem for discounts.

Join our loyalty program & earn up to 5X points on every order as well as access to exclusive bonuses and promotion rewards.

Start Earning Today

12 Reasons Why Your DTF Design Isn't Sticking

Imri Jonas Merritt


Your DTF designs look amazing on the transfer film, but they're just not sticking to the garment as they should. Adhesion problems can turn a simple project into a frustrating experience, whether you're dealing with edge lifting, incomplete adhesion, or transfers that peel off in the wash.

While DTF transfers are remarkably reliable when applied correctly, small deviations in temperature, pressure, or technique can affect your results. The good news? Most adhesion issues trace back to a handful of common causes that you can easily fix.

In this article, we troubleshoot the top reasons why your DTF transfer might not be sticking properly and offer practical solutions to get your projects back on track. Whether you're pressing with professional heat press equipment or working with a household iron, these tips will help you achieve durable, professional-quality transfers every time.

T-shirt entrepreneur in their workspace looking closely at a freshly printed DTF transfer

1. Incorrect temperature settings

If parts of your design don't stick or peel off easily, temperature issues are often the culprits. Your heat source needs to consistently hit 310°F (155°C) to properly activate the adhesive. Running too cool means the adhesive never fully bonds with the fabric, while excessive heat risks scorching your garment.

Common signs of temperature problems include transfers that lift at the edges or designs that initially stick but peel after washing. Even heat presses with digital displays can show inaccurate readings-especially on cheaper models or equipment that's seen heavy use.

Check your actual operating temperature using an infrared thermometer or heat-sensitive test strips. These affordable tools remove the guesswork and help you dial in the perfect settings for consistent results. Learn the step-by-step process for checking the temperature on your heat press or home iron.

Pro tip: Different fabrics may need slight temperature adjustments. While 310°F works great for cotton, synthetic materials like polyester often need lower temperatures to prevent scorching. Always test on a scrap piece of fabric before starting a production run.

Close up photo of temperature gauge on heat press


2. Insufficient pressure

Even with perfect temperature, transfers won't stick properly without adequate pressure. That mysterious pressure adjustment knob on top of your heat press needs regular fine-tuning to maintain consistent results. Too little pressure can leave subtle leaves gaps between your transfer and the fabric, preventing proper adhesion.

Your pressure settings aren't one-size-fits-all. Thicker garments like hoodies need different pressure than lightweight tees. Adding heat press pillows or silicone pads means adjusting your pressure to compensate for the extra layers. Even switching from cotton to polyester can require pressure tweaks for optimal results.

You don't need fancy gauges to check your pressure. The simple paper test tells you everything: if you can easily slide a piece of paper out from under your closed press, your pressure's too light. Place paper strips at all four corners to check for evenness-if some pull out while others don't, you're dealing with uneven pressure that can cause parts of your design to lift.

For more, check out our complete guide on how to check and adjust the pressure on a heat press.

Photo of adjusting the pressure knob on a heat press


3. Rushing the peel

We get it: waiting feels like watching paint dry when you're excited to see your design. But even with our industry-leading Easy Peel transfers, you need at least 5 seconds of cooling time. Surely you can count to five, right? Those few moments make the difference between a perfect transfer and one that lifts or stretches during peeling.

Here's where our motto, "Peel with your eyes," comes into play. Watch carefully as you peel, and do it smoothly-no jerking or yanking. If you spot any part of the design lifting with the carrier sheet, stop immediately. You can lay it back down and give that spot another quick press.

Practice makes perfect, and with some experience, you'll get the feel for knowing when a transfer has been set properly. For a closer look at the peeling temperatures of film types, check out our guide on the difference between hot and cold peel transfers.

Close up photo of peeling a DTF transfer


4. Skipping the second press

That first peel isn't your finish line. After removing your transfer film, covering your design with a protective guard sheet or silicone application pad and pressing again makes a huge difference in durability and appearance.

This final press does more than just seal the deal. Our protective guard sheets and silicone platen covers have a subtle texture that transforms that initial glossy finish into a natural-looking matte. Plus, this step helps the adhesive fully bond with the fabric fibers, significantly improving wash durability.

The second press takes just 13 seconds, a small investment for significantly better results. Simply cover your exposed design, press again with the same temperature and pressure settings, and you're done. Your transfers will look more professional, feel softer against the skin, and last longer in the wash.

Photo of pressing a second time


5. Pressing over garment features

Those pesky buttons, zippers, and seams aren't just obstacles-they're design destroyers if you don't handle them right. When your transfer isn't making full contact with the fabric because it's bridging over a raised surface, parts of your design won't stick properly.

Heat press pillows are your secret weapon here. These cushioned pads slip between fabric layers, creating an even pressing surface by allowing those troublesome raised areas to sink in. Different pillow sizes tackle different challenges: small ones work great for chest pockets and collar seams, while larger ones handle full-zip hoodies and button-up shirts.

Learn to work around garment features with our tips for pressing garments with zippers, buttons, or seams. You'll learn exactly how to handle everything from baseball jerseys to polo shirts without letting their structural features interfere with your transfers.

Photo of using heat press pillows


6. Moisture in the garment

Even slightly humid garments can create steam during pressing, preventing proper adhesion and potentially ruining your transfer. That brand-new box of shirts might feel dry, but if they've been sitting in a humid warehouse or cold storage, they might be holding moisture.

A quick pre-press solves this problem instantly. Just press the blank garment for 5-10 seconds before applying your transfer. You'll often see steam rising from seemingly dry shirts, and that's moisture you definitely don't want interfering with your transfer. For damp garments, running them through a warm dryer for a short cycle before pressing helps ensure they're completely dry.

Photo of a garment on the platen after giving it an initial press to remove moisture


7. Surface contamination

Dust, specks of lint, or fabric pills you can barely notice can create tiny gaps under your transfer and prevent proper adhesion. Even brand-new garments can arrive with surface debris, while used or previously worn items often harbor oils, dirt, or detergent residue that can interfere with adhesion.

While DTF transfers work great on used garments (perfect for customizing thrifted items or adding designs to favorite pieces), it's best to wash and dry them first. For any textured fabric, new or used, a quick once-over with a lint roller before pressing can make all the difference. Pay attention to areas where debris tends to gather, like inside pockets or around seams. In a pinch, you can use masking tape.

Fabric pills and fuzz balls are another common culprit. These little fiber clusters create uneven surfaces that prevent full contact between your transfer and the fabric. Solution? A basic fabric shaver makes quick work of these pesky pills, leaving you with a smooth surface that's perfect for pressing.

Closeup photo of lint, fuzz, dust - and/or you can use photos of lint roller & fabric shaver


8. Improper storage of transfers

Your DTF transfers are technically advanced products that deserve proper care. Heat, humidity, and direct sunlight are your transfers' enemies. Leaving them in a hot car or storing them near your heat press might seem convenient, but you could lead to starting the adhesive activation process prematurely.

Store your transfers in a cool, dry place, ideally in a sealed container or bag. Think of them more like photography film-exposure to extreme conditions can degrade their quality over time. Adding a silica gel packet to your storage container helps absorb any excess moisture that could affect adhesion.

While our transfers are tough, avoid bending or folding them, as this can create weak spots in the adhesive layer. Learn more about how to store your DTF transfers.

Photo of transfers rolled up in storage container


9. Textured or treated fabrics

Not all fabrics play nicely with DTF transfers. Ribbed material, waffle-knit thermals, and heavily textured surfaces create tiny valleys and peaks that prevent full contact with your transfer. Think of it like trying to stick a label on corrugated cardboard-those grooves and ridges leave gaps where adhesion fails.

Some treated fabrics pose their own challenges. Water-resistant coatings, stain guards, and certain fabric softener treatments can create a barrier between your transfer and the fabric fibers. Before pressing onto any treated material, verify that it's compatible with DTF printing. Sometimes, these protective coatings need to be washed out before the transfer can bond permanently.

Always test a small sample when working with unique materials. A successful press on a test swatch prevents you from discovering adhesion issues after pressing a full design. For textured fabrics that are DTF-compatible, try increasing your pressure slightly to help the transfer conform to the surface texture. Just be careful not to overdo it. Learn more about pressing DTF transfers on uneven surfaces.

Close-up photo of textured fabric - maybe waffle-knit thermal or fleece


10. Incorrect loading technique

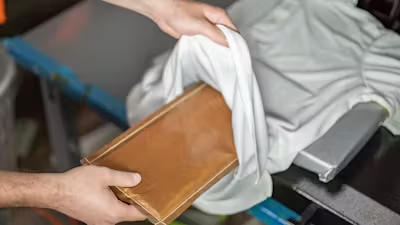
Don't assume every garment should be laid flat on your heat press. While laying works great for basic tees and lightweight garments, heavier items like hoodies and bulky jackets might need proper loading (also called threading or sleeving). Laying thick garments flat can trap excess material and create wrinkles that prevent proper adhesion.

Understanding when to load versus lay makes a huge difference in your results. Thinner materials without extra construction details press beautifully when laid flat. But for heavier garments or items with multiple fabric layers, loading helps isolate your print area and prevent bunching. If you're working with a hoodie, jacket, or other bulky item, take time to properly thread it onto your press. That extra minute of preparation prevents adhesion issues caused by trapped fabric layers.

Photo of loading vs laying


11. Uneven heat press surface

Your heat press platen might look flat, but even minor warping can create temperature and contact differences that affect transfer adhesion. These inconsistencies often develop over time, especially in cheaper presses or those that have seen heavy use. When parts of your platen aren't making even contact, sections of your transfer might stick perfectly while others barely bond.

Test your platen's evenness by placing temperature strips at different points across the surface. If you notice significant temperature variations or consistent adhesion problems in specific areas, it's time for maintenance or replacement. Remember, your heat press is an investment in your business-a warped or uneven platen costs you more in wasted materials and time than fixing the underlying issue.

Pro tip: Regular cleaning and maintenance help prevent platen issues before they start. Keep your heat press surfaces clean, avoid dropping or banging the platens, and store your press properly when not in use. A well-maintained press delivers consistent results press after press.

Photo of someone inspecting the inside of an empty heat press, or testing with temp strips


12. Printing and adhesive issues

If you're printing your own DTF transfers, inconsistent adhesion might be traced back to the printing process itself. Everything from ink quality to adhesive powder type to environmental conditions during printing can affect how well your transfers stick. Even the film you're printing on makes a difference-and all these variables need to stay consistent batch after batch.

For most users, this headache isn't worth it. Why wrestle with humidity levels, powder consistency, and curing temperatures when you can skip straight to pressing? At Ninja Transfers, we've already solved these technical challenges, testing and perfecting our process so you don't have to. Our Easy Peel transfers arrive ready to press, with consistent quality you can count on every time.

Photo of a DTF printer


Checklist for perfect DTF transfer adhesion

Before pressing:

  • Check the temperature with test strips or an infrared thermometer
  • Verify pressure with a paper test
  • Remove surface debris with a lint roller
  • Pre-press garment to remove moisture
  • Choose the correct loading technique based on the garment type
  • Insert heat press pillows for uneven surfaces

During pressing:

  • Press at 310°F for ~13 seconds
  • Maintain medium-high pressure
  • Use protective sheets/pads
  • Let cool for 5 seconds before peeling
  • Peel smoothly while watching adhesion
  • Always do the second press for 15 seconds

Regular maintenance:

  • Test platen for even heating
  • Store transfers properly
  • Keep the work area clean
  • Check pressure settings when switching garment types
  • Monitor temperature accuracy

Remember: When troubleshooting adhesion issues, start with the basics-temperature, pressure, and peeling techniques solve the most common problems.

Close-up photo of various perfectly-printed DTF transfers


Stick to success

Getting your DTF transfers to stick perfectly isn't rocket science-it just takes attention to detail and the right techniques. Most adhesion issues trace back to these common causes, and now you've got the knowledge to tackle them head-on.

Need supplies for your next project? For one-stop shopping, grab high-quality DTF transfers from Ninja Transfers and blank apparel from Ninja Blanks. Our Easy Peel technology makes application simpler than ever, while our detailed guides and tutorials help you nail every press.

Remember, even experienced decorators had to start somewhere. Take time to dial in your process, and you'll be creating professional-quality custom apparel every time.

Related Content

Don't Forget Your Blanks!

Choose From Our Popular Blank Products Below To Complete Your Order.

✓ Free next day delivery
✓ No minimums
✓ 2,000+ products
✓ Competitive pricing i Get pricing that protects your profit margin. Our blank apparel pricing rivals direct wholesalers and is as low or lower than most secondary market suppliers.
Gildan G500 成人厚重棉质 5.3 盎司T恤
starting at
$2.34

Gildan G500 成人厚重棉质 5.3 盎司T恤