Let's be real: even seasoned pros occasionally peel back DTF transfers to find a scorched shirt or misprinted design. Heat pressing might look straightforward, but nailing the perfect print takes more than just slapping on a transfer and hitting the timer.
Whether you're just starting out or running a busy print shop, knowing the most common heat-pressing pitfalls (and how to fix them) can save you time, money, and a heap of ruined garments. We've pressed thousands of shirts and learned these lessons the hard way; now we're sharing them so you don't have to.
Let's go over the mistakes we see most often and the simple fixes that will level up your pressing game.

Table Of Contents
- Pre-Press Setup Mistakes
- Wrong Temperature Or Pressure Settings For DTF
- Ignoring Fabric Types
- Forgetting Protective Cover Sheets
- Not Using Heat Press Pillows For Uneven Surfaces
- Design And Placement Mistakes
- Incorrect Design Placement
- Print Design Too Large
- Overly Complex Or Intricate Designs
- Process Mistakes
- Rushed Transfer Peeling
- Loading Vs. Laying Garments
- Eyeballing Press Time
- Skipping The Second Press
- Level Up Your Heat Press Game
Pre-Press Setup Mistakes
1. Wrong Temperature Or Pressure Settings For DTF
Getting your temperature or pressure wrong is probably the fastest way to waste materials and ruin garments. DTF transfers need precise settings—too cool or light on pressure, and they won't adhere properly, leading to peeling and poor wash resistance. Too hot or heavy and you risk scorching the fabric or causing the adhesive to bleed through, creating a stiff, uncomfortable print.
The fix: For DTF transfers, start at 310°F (155°C) with medium to firm pressure for about 13 seconds. If parts of your design aren't sticking during the peel, increase pressure first before adjusting temperature. You can't damage DTF transfers by pressing too long, but you can scorch the garment, so dial back pressure before reducing heat if you're seeing scorch marks. Always test on a scrap piece of the same material before starting a production run. Learn more about how to avoid scorch marks.
2. Ignoring Fabric Types
Different fabrics react differently to heat. What works perfectly on cotton could melt polyester or scorch delicate materials. Many beginners use the same settings for everything, leading to damaged garments and frustrated customers. Moisture-wicking athletic wear, synthetic blends, and heat-sensitive materials like nylon need special attention to avoid permanent damage. Read more in our complete guide to types of t-shirt material.
The fix: Check your garment's care label and adjust your settings accordingly. For sensitive synthetics, start 20–30 degrees cooler than standard cotton settings. Polyester typically needs 280–300°F to avoid scorching, while cotton can handle the full 310°F. When in doubt, start cooler and increase temperature gradually until you achieve proper adhesion.
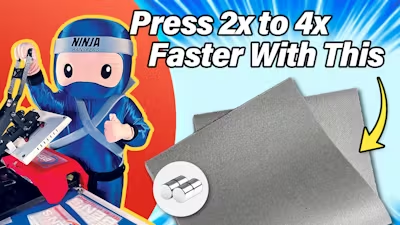
3. Forgetting Protective Cover Sheets
Pressing transfers directly onto garments is asking for trouble. Without a protective sheet between your heat platen and the garment, you risk scorching the fabric, creating unwanted shine marks, and potentially ruining both the garment and your transfer. Even worse, adhesive residue can build up on your heat press platen, leading to maintenance issues and inconsistent results.
The fix: Always use a protective guard sheet or parchment paper over your garments. This extra layer helps distribute heat evenly while preventing direct contact with the hot platen. For an even better solution, consider investing in a silicone upper platen cover. It prevents fabric scorching while adding a nice textured finish to your transfers.
4. Not Using Heat Press Pillows For Uneven Surfaces
Pressing over seams, buttons, zippers, or pockets creates uneven pressure that can ruin your transfers. These raised areas prevent proper contact between the transfer and fabric, leading to incomplete adhesion in spots that aren't getting enough pressure.
The fix: Always use heat press pillows when working with uneven surfaces. These heat-resistant foam pads slip between fabric layers or under print areas, creating a level pressing surface by allowing raised elements to sink into the padding. This simple step ensures even pressure distribution and complete transfer adhesion across your entire design.

Design And Placement Mistakes
5. Incorrect Design Placement
Nothing screams “amateur” like a crooked logo or off-center design. Eyeballing placement might seem fine for small runs, but it's wildly inconsistent and becomes a major time-waster when you have to reprint shirts because the placement was wrong. Refer to our DTF transfer placement guide to get it right every time.
The fix: Invest in a DTF alignment ruler set to eliminate guesswork. Secure transfers with thermal heat tape to hold everything in place while pressing. For even better results, print paper templates and test placement on multiple shirt sizes before pressing transfers.
6. Print Design Too Large
Massive prints might look impressive on your computer screen, but they often create practical problems on actual garments. Large solid designs reduce breathability and can feel stiff and uncomfortable. Oversized designs also flex more with movement, which can lead to cracking or peeling over time. Learn more about how to scale DTF designs for larger garments.
The fix: Scale your designs modestly. Most full-front prints look best between 10 and 11 inches wide. Instead of large solid areas, “knock out” non-essential parts to let the shirt fabric show through. Smaller designs also help you gang transfers onto a single sheet, reducing production costs. You can also use techniques like halftoning your graphics to keep the look bold without making the print feel heavy.
7. Overly Complex Or Intricate Designs
Tiny text, ultra-thin lines, and intricate details might look amazing in your design software, but they can become a nightmare during production. Complex elements can blur when pressed, and small pieces may peel easier due to limited adhesion area. For more on this, read our top 10 DTF design tips for beginners.
The fix: Keep your designs bold and clean. Text should be at least 12 points (about 1/8 inch) tall, and line weights should stay above 1 point thickness for best results. Simplify illustrations where possible and test detailed designs on scrap material before committing to production.

Process Mistakes
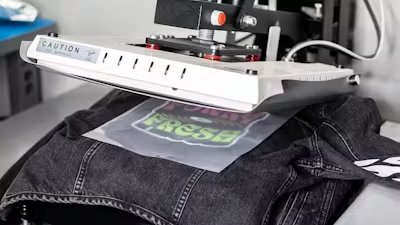
8. Rushed Transfer Peeling
While our Easy Peel technology cuts down cooling time, rushing your peel can still cause problems. Quick, jerky motions or peeling too soon can tear detailed areas or lift sections that haven't fully adhered.
The fix: Wait at least 5 seconds after pressing, then peel in one smooth, steady motion starting from a corner. Hold the garment down with your free hand. Most importantly, “peel with your eyes.” If any part lifts, stop, lay it back down, and give that area a quick second press.
9. Loading Vs. Laying Garments
Many decorators automatically thread every garment onto their heat press out of habit, slowing production speed. While loading has its place, simply laying garments flat works for most DTF applications and can cut pressing time significantly. Learn more about loading vs laying.
The fix: For basic t-shirts and lightweight garments, lay them flat. Save loading for heavy garments (hoodies/jackets), items with structural elements (zippers, buttons, seams), or when you need to isolate areas near pockets or features.
10. Eyeballing Press Time
Counting seconds in your head leads to inconsistent results. When you're busy or distracted, “one Mississippi” just doesn't cut it for professional production.
The fix: Use your press's built-in timer if available. If not, use a smartphone timer or simple kitchen timer. Consistent timing equals consistent results—and helps you catch adhesion problems before they show up in the wash.
11. Skipping The Second Press
Don't package that garment right after peeling—you're missing a crucial final step. A second press improves hand feel, reduces any plastic-like shine, and boosts wash durability by ensuring complete adhesion.
The fix: Cover your exposed design with a protective guard sheet or parchment paper and press for about 10–15 seconds using the same temperature and pressure settings. For a matte look, use a silicone application pad. Either way, don’t skip it—this is the difference between a good print and a great one.

Level Up Your Heat Press Game
Heat pressing might seem tricky at first, but avoiding these common mistakes puts you way ahead of the curve. Remember, even veteran printers started somewhere, and every mistake teaches you something valuable. The key is learning from those lessons without letting them drain your wallet or confidence. If you're still new to DTF transfers, our comprehensive glossary of terms will help you get up to speed.
Start with quality supplies, take time to dial in your settings, and never skip the fundamentals like proper alignment and that crucial second press. With a bit of practice and attention to detail, you'll be cranking out professional-quality prints that keep customers coming back. At Ninja Transfers, you can get equipped with premium DTF transfers, protective sheets, and alignment tools—and you can grab your blank apparel from Ninja Blanks. We've got everything you need to nail your next project.